

How to Build a Mobile App from Scratch in 2026
September 2026 · DNS Progress Team
Building a mobile app can feel overwhelming. There are technology choices to make, designs to create, code to write, stores to submit to, and a hundred decisions in between. But the process is not mysterious — it follows a clear sequence of steps, and understanding those steps is half the battle.
This guide walks through the entire journey, from “I have an idea” to “my app is live on the App Store and Google Play.” Whether you are building it yourself, hiring a team, or somewhere in between, this is the roadmap.
Step 1: Define the problem and validate the idea
The biggest risk in building an app is not technical — it is building something nobody wants. Before writing a single line of code, answer these questions:
- Who is this for? Define a specific user, not “everyone.”
- What problem does it solve? If you cannot state it in one sentence, the idea needs sharpening.
- Why would someone download this? What is the immediate, obvious value?
- What is the smallest version that works? This is your MVP — the minimum feature set that delivers the core value.
Talk to potential users. Show a sketch or a landing page and see if people sign up. The goal is to validate demand before investing time and money.
The most expensive app is the one you build, launch, and discover nobody needs. Validate first, build second.
Step 2: Choose your technology
With a validated idea, the next decision is how to build it. You have three main paths:
Native (Swift / Kotlin)
Build separate apps for iOS and Android using each platform’s native tools. This gives you the best performance and full access to every device feature, but you maintain two codebases.
Cross-platform (React Native / Flutter)
Write one codebase that runs on both iOS and Android. This is the most popular approach for startups and mid-size companies in 2026 — you get near-native performance with roughly half the development effort.
PWA (Progressive Web App)
Build a website that behaves like an app. No app store required, instant updates, works on all devices. Best for content-driven products and quick validation, but limited in hardware access and push notifications.
For most businesses starting their first app, cross-platform (React Native or Flutter) is the pragmatic default. It balances cost, speed, and quality in a way that serves most use cases.
Step 3: Design the user experience
Good design is not about making things pretty — it is about making things work. The design phase produces the blueprint your development team will follow.
User flow mapping
Before any visual design, map out how a user moves through your app:
- What happens when they open the app for the first time?
- What is the core action they need to take?
- What screens do they pass through to complete that action?
- Where might they get stuck or confused?
Sketch these flows on paper or a whiteboard. Keep it simple — if the flow is complicated on paper, it will be worse in code.
Wireframes
Low-fidelity wireframes define the layout of each screen without colors, fonts, or branding. The goal is to nail the information hierarchy: what appears first, what is clickable, what leads where.
Visual design
Once the wireframes are approved, add your brand — colors, typography, icons, and imagery. This is where your app starts to look like your app, not a generic template.
Prototype
A clickable prototype lets you (and potential users) tap through the app before any code is written. This catches usability problems early, when they are cheap to fix.
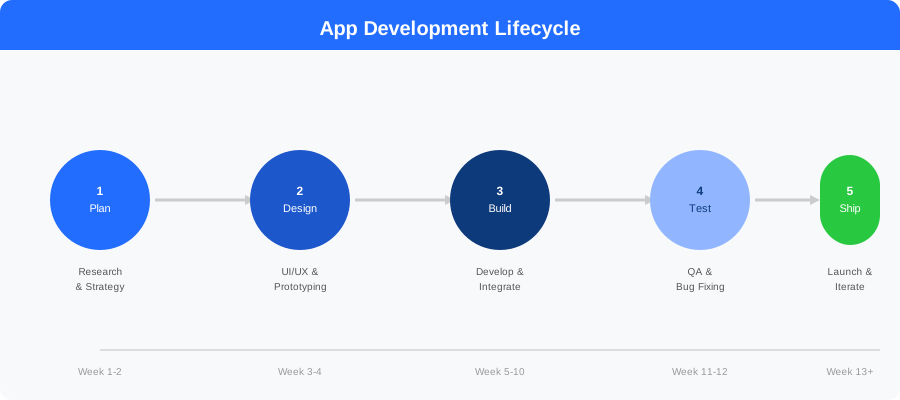
Step 4: Build the app
This is where the design becomes working software. Here is what a typical build phase looks like:
Sprint-based development
Modern app development happens in short cycles called sprints (usually 1–2 weeks). Each sprint delivers a working piece of the app that can be reviewed and tested.
A typical first sprint focuses on the core functionality — the primary action your app exists to support. Subsequent sprints add secondary features, polish, and integrations.
Backend and API
Most apps need a server-side component — a backend that handles user accounts, data storage, notifications, and business logic. This can be built with Node.js, Python, Go, or any server-side framework. If you are using Firebase or a similar service, much of this is handled for you.
Third-party integrations
Very few apps are built entirely from scratch. Common integrations include:
- Authentication — Sign in with Google, Apple, or email
- Payments — Stripe, Apple Pay, Google Pay
- Analytics — Firebase Analytics, Mixpanel
- Push notifications — Firebase Cloud Messaging, OneSignal
- Maps — Google Maps, Mapbox
Each integration adds complexity, so include only what your MVP needs.
Version control and CI/CD
Use Git for version control from day one. Set up continuous integration (CI) to automatically build and test your app on every code push. This catches bugs early and makes deployment predictable.
Step 5: Test thoroughly
Testing is not a phase that happens after development — it runs in parallel. But there is a concentrated testing push before launch.
What to test
- Functional testing. Does every feature work as expected?
- Usability testing. Can real users complete tasks without help?
- Performance testing. Does the app load fast? Does it handle many users simultaneously?
- Device testing. Does it work on different screen sizes, OS versions, and hardware?
- Edge cases. What happens with no internet? Low battery? Corrupted data?
Beta testing
Release a beta version to a small group of real users before going public. Platforms like TestFlight (iOS) and Google Play Internal Testing make this straightforward. Watch for crashes, confusing flows, and feedback that contradicts your assumptions.
Step 6: Submit to app stores
Both Apple and Google have review processes. Here is what to prepare:
App Store (iOS)
- An Apple Developer account ($99/year)
- Screenshots for every required device size
- App description, keywords, and category
- Privacy policy URL
- App review may take 24–48 hours
Google Play Store
- A Google Developer account ($25 one-time fee)
- Screenshots and feature graphic
- App description and content rating questionnaire
- Privacy policy URL
- Review is typically faster (a few hours to 2 days)
Common rejection reasons
- Broken links or placeholder content
- Missing privacy policy
- App does not match its description
- Crashes during review
- Insufficient functionality (too minimal)
Plan for at least one round of rejection and resubmission. It is normal.
Step 7: Launch and iterate
Publishing the app is not the finish line — it is the starting line.
Launch checklist
- Monitor crash reports in the first 48 hours
- Respond to user reviews (especially negative ones)
- Track your key metrics: installs, retention, session length
- Have a plan for quick bugfix releases
Post-launch iteration
The first version of your app will not be perfect. That is fine. The goal of version 1.0 is to get real users using the product and generating data.
Based on that data:
- Double down on features people love
- Remove or rework features nobody uses
- Fix the bugs that cause the most frustration
- Add the features that users request most
This cycle — build, measure, learn — is how every successful app evolves.
How long does it take?
Realistic timelines for a typical MVP:
| Phase | Duration |
|---|---|
| Planning and validation | 1–2 weeks |
| Design (wireframes + visual) | 2–3 weeks |
| Development | 6–10 weeks |
| Testing and QA | 2–3 weeks (overlapping with dev) |
| App store review | 1–3 days |
| Total | ~3–4 months |
Complex apps with advanced features (real-time sync, video, AR) will take longer. Simple tools and information apps can launch in 6–8 weeks.
How much does it cost?
App development costs vary widely based on scope, complexity, and team structure. For a detailed breakdown, see our guide on mobile app development cost. As a rough range:
- Simple MVP: $15,000 – $40,000
- Mid-complexity app: $40,000 – $100,000
- Complex app (fintech, marketplace, social): $100,000+
The key insight: start small. A focused MVP delivered in 3 months will teach you more than a feature-packed app delivered in 12 months.
Do you need to build it yourself?
Not necessarily. Many successful businesses outsource their app development to specialized teams. This can be faster, more cost-effective, and produce better results than hiring an in-house team — especially if app development is not your core competency.
What matters is that you understand the process (which you now do) so you can make informed decisions and evaluate the work being done.
At DNS Progress, we guide businesses through every stage of this process — from validating an idea to launching on the app stores. If you have an app idea and want to understand what it takes to bring it to life, talk to us — the first conversation is free.
Related articles
From Idea to Launch: How We Build Digital Products
A behind-the-scenes look at how the DNS Progress team takes a product from a rough idea to a launch on Google Play — with a process built for speed and quality.
Read article →
What Is DNS Propagation and How Long Does It Take?
DNS propagation explained in plain language: what it is, how long it takes after a DNS change, why your website still shows the old version, and how to check its status.
Read article →
How to Save a Location So You Can Actually Find It Again
Learn how to save a location with a pin, a photo and a note — and why a map beats a notes app for saving locations you can find again months later.
Read article →Need help building your product?
We build mobile apps, websites, and custom software for businesses. Tell us about your project and get honest advice — free.